From coarse to fine
Which grit do I need?
Lots of people know P80 or P400 – but not when to use which. Here's what the number means, which grit suits which step and material, and which comes next.
Calculate grit sequence ↓The film
Which grit do I need?
From P40 to P3000 – the next grit is at most twice as fine.
1 · Understand
What the number means
What does the grit number mean?
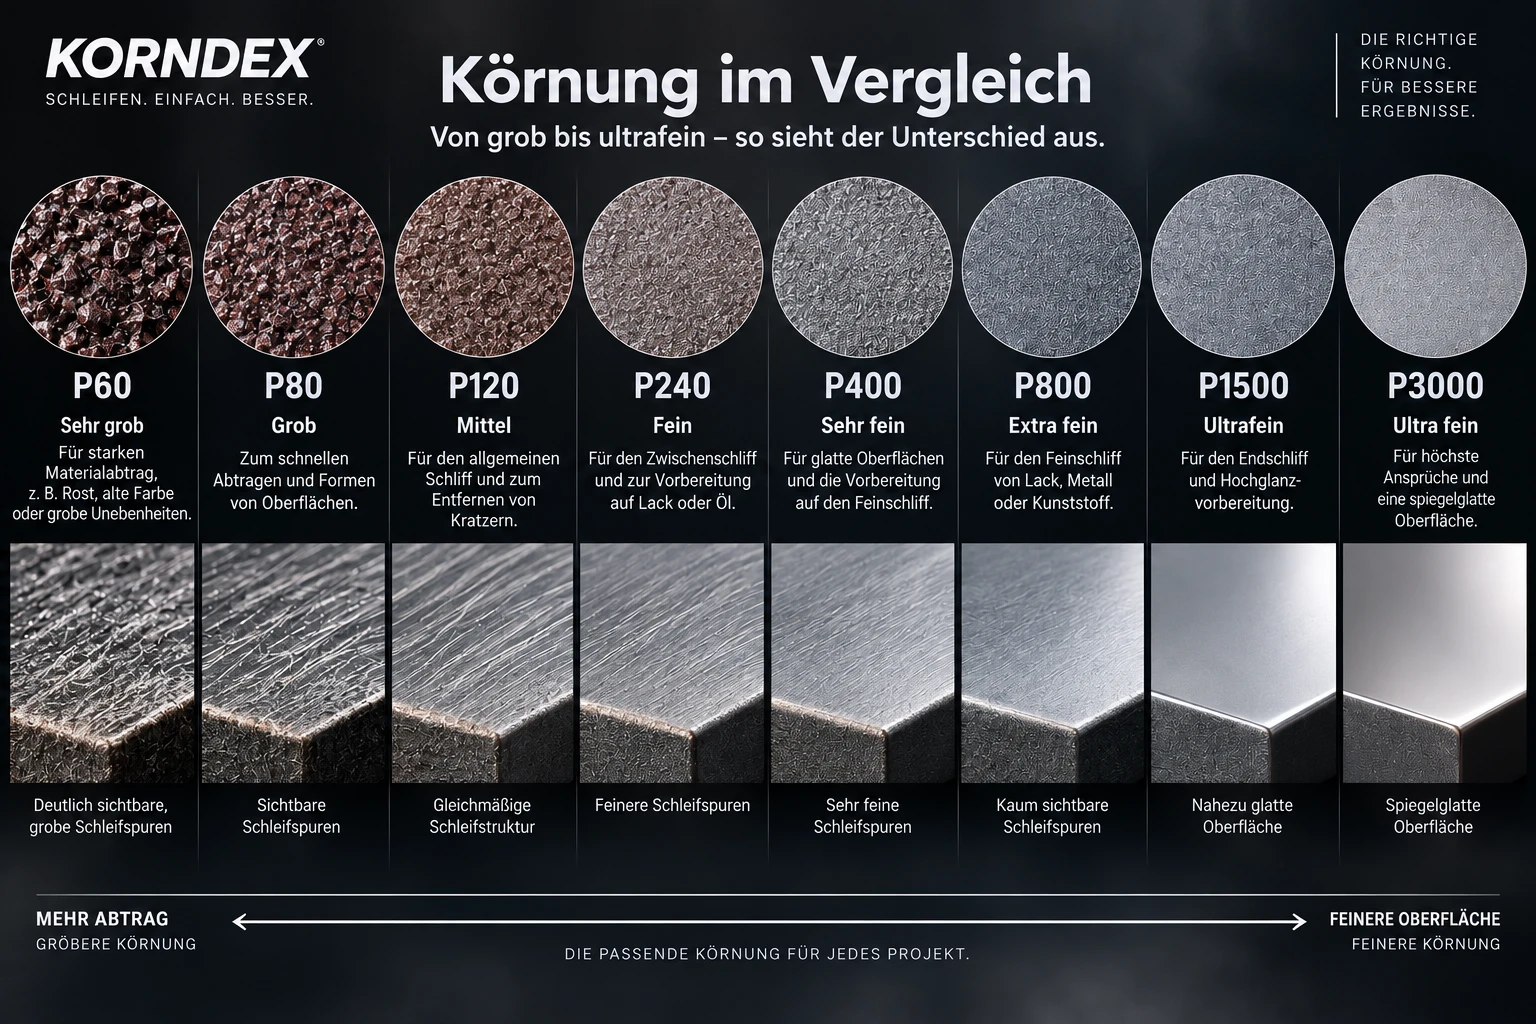
The number after the P (FEPA standard) states how many meshes per inch a sieve has that the grain still passes through. The higher the number, the finer the grain and the finer the finish.
1 · Understand
The five ranges
From heavy removal to the finish before polishing – every range has its job.
2 · Plan
Your grit sequence
Where are you now, where do you want to get to? The sequence in between appears instantly – every grit leads to its uses and matching products.
4 grits from P80 to P400 – 3 changes:
Never more than double per step – that way the scratches of the previous grit disappear. An extra intermediate step never hurts.
Buy this sequence
For each product from the grits it comes in – still with no more than double per step.
- PRO CUT 150
P80 → P120 → P240 → P400
PRO CUT 150, 1 × smallest pack each (10 pcs) in P80, P120, P240, P400. Incl. VAT, plus shipping.
- PRO NET 150
P80 → P120 → P240 → P400
PRO NET 150, 1 × smallest pack each (10 pcs) in P80, P120, P240, P400. Incl. VAT, plus shipping.
- PRO CUT 125
P80 → P120 → P240 → P400
PRO CUT 125, 1 × smallest pack each (10 pcs) in P80, P120, P240, P400. Incl. VAT, plus shipping.
2 · Plan
Which grit for which material?
The proven sequence for each material and surface – with the grits for every step.
Car & paint
12 grits, P80 to P3000
Wood
5 grits, P80 to P320
Metal
7 grits, P60 to P400
Plastic
7 grits, P180 to P1000
Body filler
4 grits, P80 to P240
Primer
3 grits, P320 to P600
3 · Sand it right
Common mistakes – and how to avoid them
The right sequence alone isn't enough. These are the places where sanding most often goes wrong.
01
Skipping grits
Going straight from P80 to P240 leaves the deep scratches in place, and they show up in the paint at the latest. Double at most – the calculator names the steps in between.
To the calculator ↑02
Changing too early
Only move on once the scratches from the previous grit are gone everywhere. A guide coat or pencil marks show where you haven't sanded yet.
03
Pressing too hard
Pressure makes deeper scratches and hot spots. Let the grit and the machine do the work – if it stops removing material, the disc is worn out.
Avoid pigtails →04
Carrying on with blunt paper
Clogged or worn abrasive polishes instead of sanding and leaves irregular scratches. Changing it in time saves time in the end.
When is the disc worn out? →05
Fine sanding paint dry
From about P800, paint is usually wet sanded: the water flushes away the sanding dust, the grit doesn't clog and the scratch pattern is more even.
Wet or dry? →06
Not removing the dust
Coarse grit left lying on the surface scratches on the next pass. Vacuum or wipe down between steps.
Dust extraction and mask →
4 · Look up
Every grit in detail
Uses and next step for the common series P40 to P3000, sorted by range. Even coarser (from P24) and finer grits (up to P5000) exist for special cases. Click a grit for its neighbours and products – and the converter translates US grit on the pack.
CoarseP24–P80Heavy stock removal
MediumP100–P180Shaping and levelling
Rough sanding. Remove saw marks on wood, the step up from P80.
Next: P180
Levelling. Level surfaces, shape body filler, key metal.
Next: P240
Intermediate sanding. Wood before fine sanding, feathering filler edges.
Next: P240
Feathering / filler. Level filled areas, feather edges into the old paint.
Next: P320
FineP220–P400Smoothing and preparing
Before oil and varnish. Wood before oil and varnish, first smoothing of primer.
Next: P400
- P240
≈ 220–240 Grit (US)
Fine sanding wood. Preparing for primer, fine sanding wood, smoothing metal.
Next: P400
- P320
≈ 280 Grit (US)
Fine sanding. Fine surfaces, sanding primer surfacer, final corrections.
Next: P600
- P400
≈ 320 Grit (US)
Primer / paint. Smoothing primer surfacer and primer, preparing for the top coat.
Next: P800
Very fineP500–P1000Keying paint
- P500
≈ 360 Grit (US)
Fine primer sanding. Fine sanding of primer surfacer, plastics before painting.
Next: P1000
- P600
≈ 400 Grit (US)
Paint preparation. Keying paint for a perfect finish before the top coat.
Next: P1200
- P800
≈ 500 Grit (US)
Keying paint. Matting top coat, sanding between clear coats.
Next: P1500
- P1000
≈ 500–600 Grit (US)
Fine matting. Clear coat before recoating, fine sanding plastics.
Next: P2000
Ultra-fineP1200–P5000Finish before polishing
- P1200
≈ 600 Grit (US)
Wet sanding. Start of finish sanding, usually wet.
Next: P2000
- P1500
≈ 800 Grit (US)
Paint defects. Remove dust nibs and runs in the clear coat.
Next: P3000
- P2000
≈ 1000 Grit (US)
Before polishing. Before polishing, wet, with light pressure.
Next: P3000
- P2500
≈ 1000–1200 Grit (US)
Ultra-fine finish. Smooth out the finest scratches, cut polishing time.
Next: P3000
Polish preparation. Right before polishing – hologram-free.
Next: polish
Any questions?
FAQs about grit
Wet or dry sanding?
Up to about P600, sanding is usually dry with dust extraction. From P800, paint is usually wet sanded: the water binds the dust, the grit doesn't clog and the scratch pattern is more even. Wood is always sanded dry.
What's the difference between P grade and grit?
P grades follow the European FEPA standard, grit the US standard (CAMI/ANSI). Up to 220 both numbers are practically the same; above that the P number is higher: 600 grit is roughly P1200.
Which grit before painting?
Wood before the first coat with P180 to P240, between coats with P240 to P320. On a car, sand the primer surfacer with P320 to P400, before a light top coat or metallic up to P500 to P600; matt sound old paint with P400 to P600 dry or P800 wet.
Which grit before polishing?
Finish with P2000 to P3000, wet and with light pressure. The finer the last sanding step, the faster the polish takes the scratches out.
How can I tell the disc is worn out?
It barely removes material any more, gets hot or leaves shiny, uneven patches. Change it then – blunt grit only polishes, it doesn't sand.
And which for your project?
The finder asks about material, machine and goal – and tells you the grit and product.
Start the abrasive finder →